International Heilkunst Association Natural Healing For Today's World
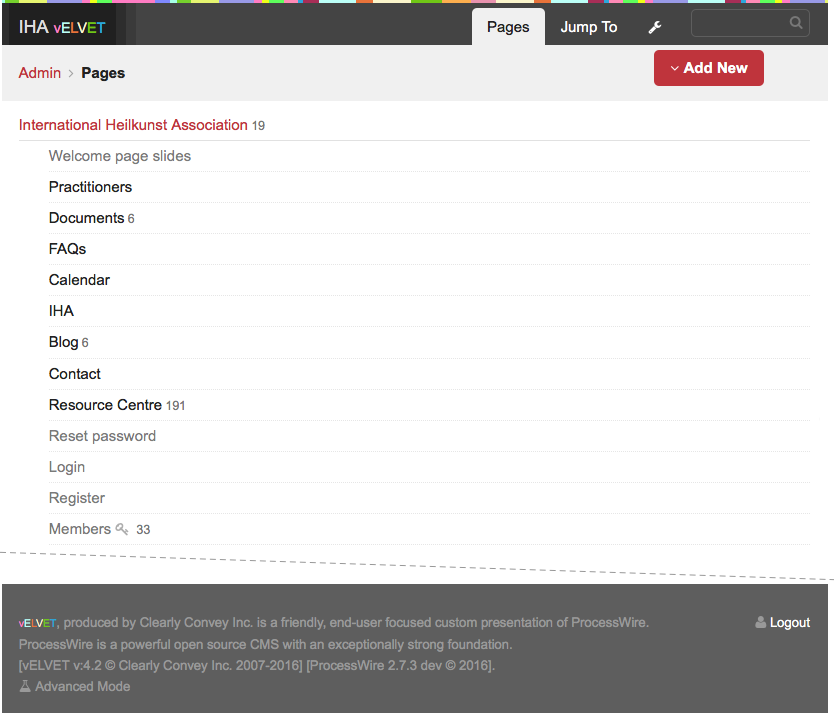
Help
This help information is for IHA members, if you are not an IHA member and have a question please contact us.
Table of contents
Who should read what- All members of IHA
- Anyone with 'authors', 'blog-author' or 'manage-members' roles
- All who write blog posts
- All who manage members
NEW MEMBERS!
All members, please read Warnings before you start making changes to the website.
If you are a new member or a normal member, read from here down to Returning to the public side for all you need to know, the topics explain how you:
- register on this website
- set your password
- login
- edit your bio or update your photo.
Accessing the member-only content of the IHA website
Your own login
This website provides each member with their own personal login (their own individual login name and password) to access member-only content, but before your first login, you need to register.
Register
To register you need to have been invited by the IHA, this invitation will be by email. Once you have received this email, to register, scroll to the bottom of any page and click 'Admin' to reveal this:
 Click 'Register', you will be asked to enter your username and temporary password (this is to check you are someone who is allowed to register here). Your username and temporary password should have been emailed to you by the IHA Members Manager.
After successfully submitting these you are given the opportunity to:
- to edit your name—in case of a misspelling, important since once registered your name is not easily changed
- choose your own password
- provide your email address (so the system can email you should you ever forget your password).
After sumiting these you are registered and may login.
Login
Once registered you may login, to do so, click 'Admin' at the bottom of any page and then click 'Login' in the same spot, then login with your username and the password you chose for yourself when you registered.
Once you are logged in
Once you are logged in you will see some additional content.
Resources for Practitioners
The most notable additional content available to the logged in member is 'Resources for Practitioners' under the Resource Centre (anyone visiting the Resource Centre who is not logged in will see only 'Resources for the general public' and a prompt to 'Login for Resources for Practitioners').
Info panel
In addition to Resources for Practitioners, the logged in member will also see a yellow panel at the bottom of any page, it will look similar to this:
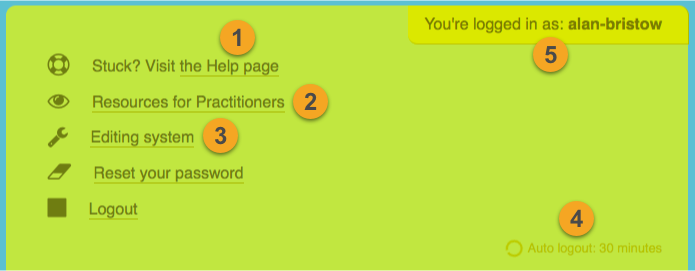
This panel allows you to:
- jump quickly to this, the help page
- jump quickly to the resources page to access members-only content
- enter the editing system
- see how long you have until you are automatically logged out, this counts down 30mins from when you last refreshed/reloaded the page either by:
• clicking your browsers Refresh/Reload button,
• saving a page (if you're editing),
• or visiting a different page - see who you are logged in as (useful for a few members who may have more than one login).
Members seeing 'No page found'
If you logged in, visited a member-only page and 30mins went by before you did any of the things listed in point 4. above, then the system will show a 'No page found' message since you are no longer logged in and attempting to see something only visible for (logged in) members. Solution: do one of the things listed in 4. above or just login again.
Editing system
You will probably not need to use the editing system often. It allows you to:
- edit your bio text
- edit your contact details or accreditations
- replace your bio photo.
If you need to carry out one of these tasks, click 'Editing system' (3. in the above image) and you will see a page similar to this:
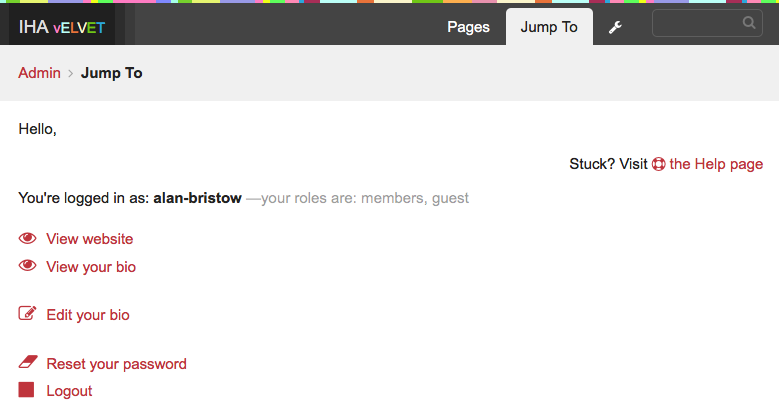
From here the most common things you may want to do are:
- View website
(return to the home page on the 'public side' of the website) - View your bio
(as for 1., you are sent to the 'public side' of the website but to your bio page) - Edit your bio
(remain on the 'private side' of the website and go to the page where you edit your bio, see below).
Edit your bio
Clicking 'Edit your bio' will take you to the page that holds all your bio details in editable form—your bio editing page will look similar to this:
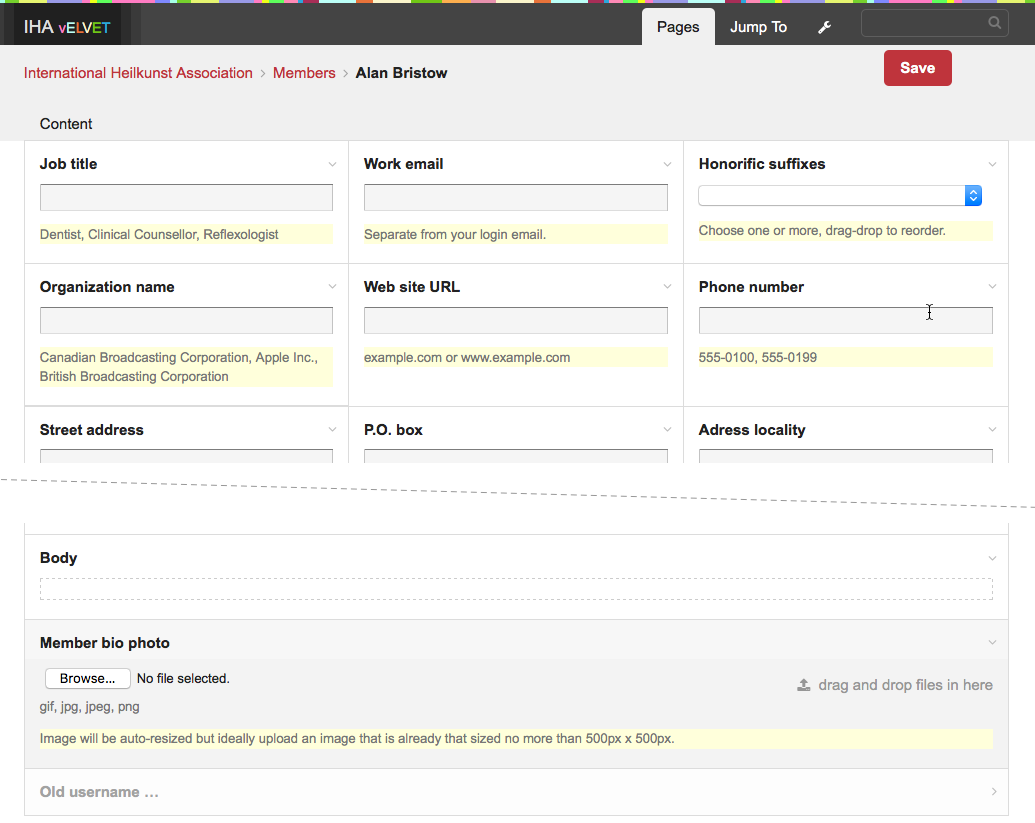
Easy—just use the fields
Editing your bio is easy, simply use the given fields with your information and once you have the changes as you wish them, click save.
TIPs:
- each field's yellow highighted text helps you by providing examples or help for entering text in that field
- since saved changes are permanent you may wish to copy/paste text to a document of your own before you carry out edits, in case you want to enter text back how it was.
Returning to the public side
After saving any changes, if you want to check your bio, simply click 'Jump To' at the top of the page and then choose 'View your bio'.
This concludes the topics members may usually wish to read, what follows may safely be ignored by all members other than those chosen to fulfill the 'Author', 'Manage members', etc roles.
Beyond normal member use
You do not need to read from here down if you are a normal member, (normal members start at NEW MEMBERS!), only the member manager, blog authors or page authors need to read on from here.
vELVET
vELVET, the content management system (CMS), provides four distinct roles:
- members
- authors
- blog-author
- manage-members
These are explained below.
'members' role
The 'members' role is automatically assigned to anyone who is added to the system. Anyone with the 'members' role is able to access Resources for Practitioners and edit their own bio, including their qualifications (B.Sc., DHHP, DMH., etc).
Not 'Areas of expertise'
A member may not edit their own 'Areas of expertise' (Doctor of Medical Heilkunst, Dynamic Health Counsellor, etc). This part of a members bio may only be edited by the person given the 'manage-members' role.
'authors' role
The 'authors' role is not automatically assigned to anyone, however the 'manage-members' role can assign it to one or more members.
Anyone with the 'authors' role is able to:
- edit other members bios (though not their 'Areas of expertise')
- add/edit resource pages
- add/edit other pages (other than blog posts), for example Calendar entries, FAQs or Documents
- re-order pages, for example FAQs.
'authors' login in the same way as anyone else, however after loggin in, on edtable pages (most pages) in the footer they will see an additional 'Edit this page' link. Also if they click the 'Editing system' link in the footer (see '3' in the image above), they will see some differences compared to a regular 'members' login, notably 'Member skills' and the 'Page tree', covered below.
Member skills
Although likely to be a rare requirement, should the IHA wish to add a whole new area of expertise, or edit one of the existing ones, then those with the 'authors' role may make such changes by logging in, clicking 'Editing system' in the footer (or clicking 'Jump To' at the top of an admin page) and then clicking one of the links under the 'Member skills' heading (shown here):
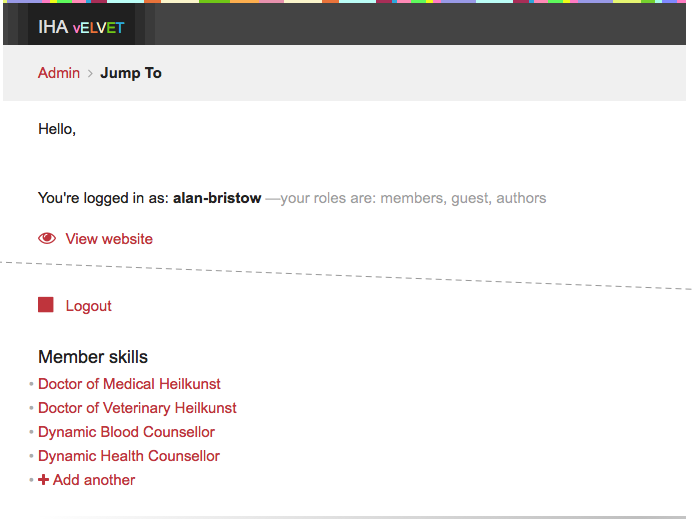 The links under the heading 'Members skills', shown above allow those with the 'authors' role to edit a skill (by clicking it's title) or to add a new one.
Example - edit a skills' description
For example, at time of writing if you look on the Practitioners page this is part of the copy you see:
Doctors of Medical Heilkunst
IHA members are spread wide, as detailed in the directory of doctors of medical heilkunst.
The above text, both title and description, may be edited by clicking the 'Doctor of Medical Heilkunst' link.
Resource categories
Similarly to Member skills above, managing Resource categories, likely to be a rare requirement, can be carried out just underneath the 'Member skills' area.
You may edit the title of a Resouce category by clicking on it.
Adding a resource category
Also at the end of the list of Resource categories you may click to add another—usually this will not be needed/should NOT be done here, because when you add a resource, the new resource page will a place where you can choose the category or add a new category; so usually new categories will be made at the time a resource is added.
Page tree
The second and more common reason for someone logging in with the 'authors' role is to make changes to other pages on the website via the 'page tree'.
To get to the 'page tree', login with an account that has the 'authors' role, click 'Editing system' in the footer and then click 'Admin' as shown in the top-left of the above image. This brings you to the 'page tree', similar to the one shown here:
The 'page tree' allows you to edit, add, re-order and delete pages and content.
The interface is mostly self explanatory and becomes simple and familiar with use, however here are a few examples to explain a few typical uses.
Example: editing a page under 'Documents'
Below you see the steps to edit a page in the 'Documents' section: click 'Admin' (as noted above), click 'Documents' and then hover your mouse over the document you want to edit and click the revealed 'edit' button.

After clicking 'edit' you go to the page in question and are able to edit copy, save, add images, etc. The editing should be self explanatory but if in doubt ask your web designer.
TIP: Use Search—4 letters or more
Above we navigated to the document IHA Regulations — Code of Ethics. Another way to open a page for editing is just type in the search box:
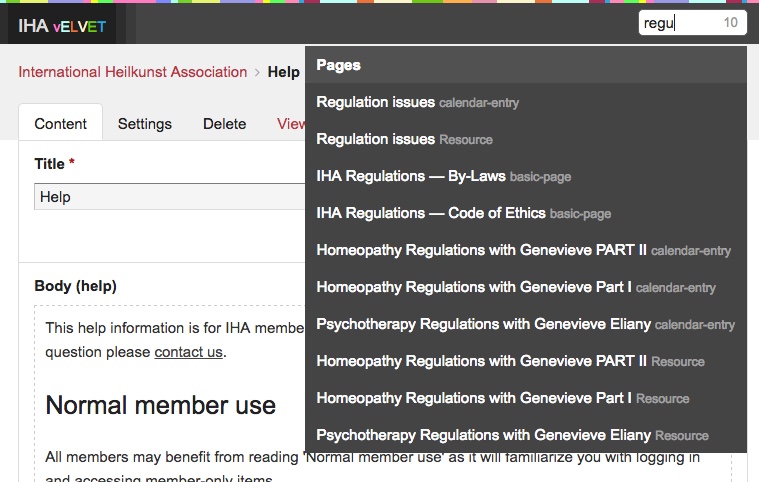 While not all pages will be findable this way, most will, and typing '
regu' (for example) and clicking the title of the document you want to edit is the quickest way to jump straight into editing.
Note: Search works well for 4 characters or more, so for example if you want to edit IHA Regulations — Code of Ethics it's better to type 'regu' rather than just 'reg'.
Example: adding a calendar entry
As above, visit the 'page tree' by clicking 'Admin', then hover your mouse over 'Calendar' and click the 'edit' button.
This takes you to a page where all the calendar entries are shown, scroll to the bottom and click the '+ Add New' button.
You will be presented with a new blank calendar entry page, fill it in and click 'Publish' and your new entry will be live.
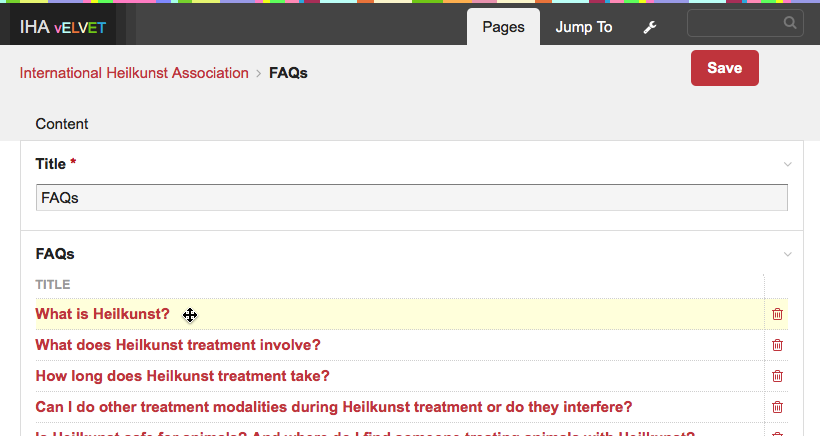
Example: FAQs
As for the calendar entry above, you may edit the page titled 'FAQs' and from there scroll down to add a new FAQ.
In addition to adding new FAQs, you may also re-order the FAQs, from the following view simply drag-and-drop up or down any FAQ and click 'Save' and the next time someone visits the FAQ page the order will be changed:
Example: adding / editing resources
The image below shows three ways you may work with resources:
- add a resource
- edit a resource via the page tree
- edit a resource by finding it in the search box
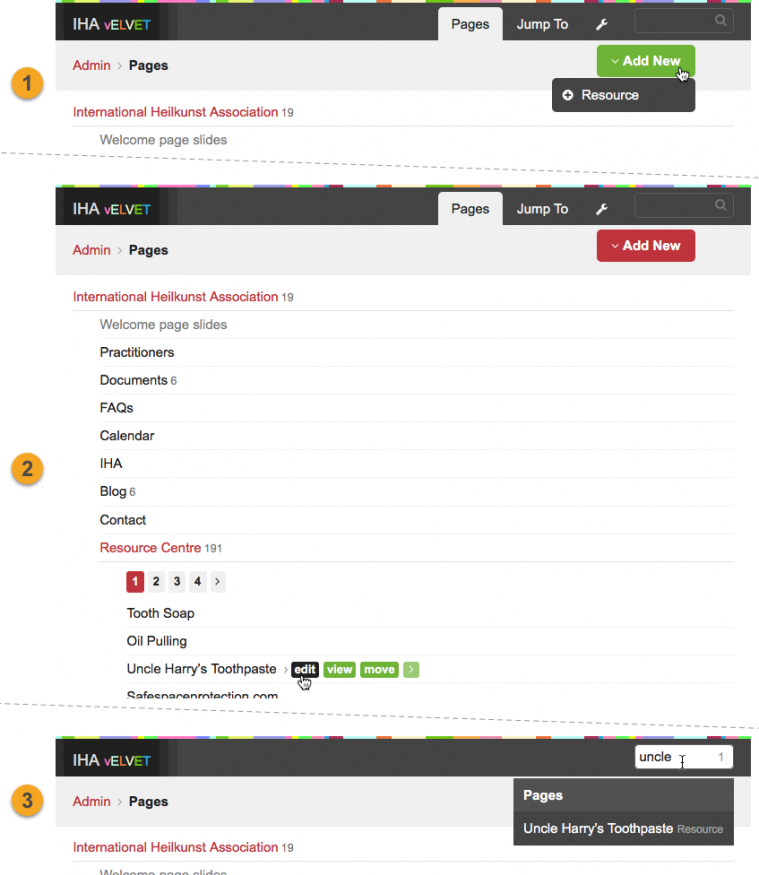
1. add a resource
Area 1. in the image above shows how once you have logged in and clicked 'Admin' you see a 'Add new' button at the top-right, use this to add a resource. After clicking '+ Resource' you are taken to a form where you enter the resource name, do not include the person in the name as this is automatically added by the system when you later choose the author of the resource.
After giving the resource a name you are prompted to choose the resource type, 'General public' or 'Members practitioners', this determines if the resource is visible to the general public or only members. Then you are provided with the remaining fields to fill in for the resource, these are mostly self explanatory as they include help info.
2. edit a resource via the page tree
Area 2. in the image above shows how once you have logged in and clicked 'Admin' you can click to 'drill down' into the 'Resource Centre' and edit any existing resource.
3. edit a resource by finding it in the search box
Area 3. in the image above shows how you can type the title from any normal page into the search field top-right, in this case 'uncle' to find the 'Uncle Harry's Toothpaste', and then click the result in oder to go striaght to that page for editing. More about search.
Writing a page in stages
If you write part of a page but need to leave it and return at a later time to finish it, you can. But you don't want to simply save it as you will leave a part-written page for all to see. There are two solutions.
Save + Keep Unpublished
You can click the Save + Keep Unpublished button rather than the Publish button. Only when you click the Publish button will the page become visible to people.
The only disadvantage to this route is that you can't use search to re-find the page when you return to edit it later on, you just need to remember where it is in the page tree and return there to edit it.
Hide page
If you want the convenience of being able to use Search to find the page next time you come to edit it, then save the page with the Publish button (which will mean people can see it) but once it's saved, click the Settings tab near the top of the page you are editing and then click Hidden: Excluded from lists and searches and finally click Save again.
Until you un-check Hidden: Excluded from lists and searches and click Save again, the page will not be shown to people (so make sure you do this when you have completely finished) and each time you login to edit it more you will be able to find it using Search.
'blog-author' role
The 'blog-author' role is not automatically assigned to anyone, however the 'manage-members' role can assign it to one or more members.
Anyone with the 'blog-author' role is able to carry out all work with the blog, such as creating blog posts, editing or deleting blog posts.
If you have the 'blog-author' role you login in the same way as anyone else, however after logging in, click the 'Editing system' link in the footer and you will see a link to 'Blog system' and a 'Blog' tab, click either of these and you will be taken to the blog system.
'Quick Post' 'Add'
Clicking 'Posts', shown in red below, takes you to a spot where you may easily add a new blog post:
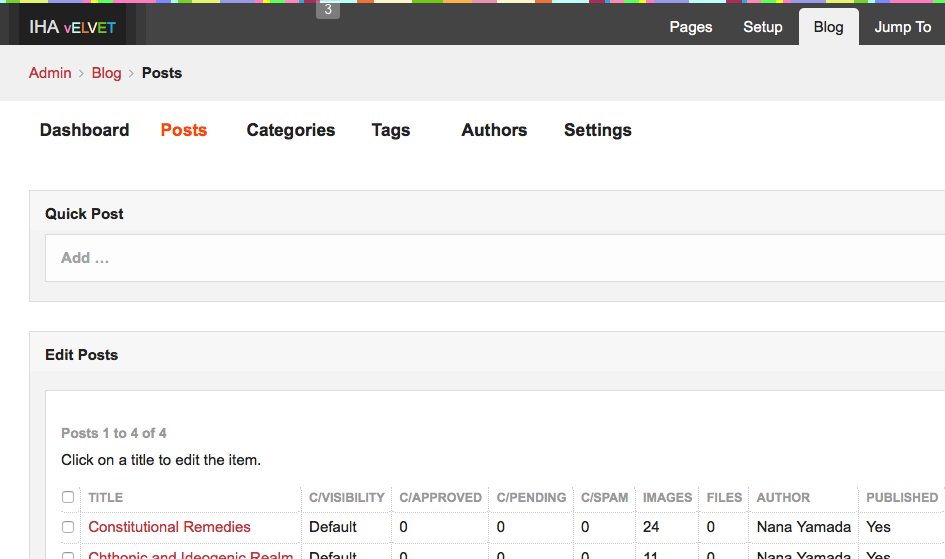
Click 'Add' under 'Quick Post' and a pop-up window is shown where you may begin to write your blog post.
Note: After clicking 'Add', until you click 'Publish' or 'Save Unpublished' at the bottom, there is only a pop-up window, not a real page able to store text etc, so the procedure for adding a post is:
- click 'Add' under 'Quick Post'
- enter a title
- click 'Save Unpublished' (returning you to the view shown in the above image)
- click the red title of the new blog post to open it for full editing now it's page has been created.
Tip: You may save a blog post with the 'Save Unpublished' button and leave it indefinitely allowing you to compose, edit etc over a period until you are happy to publish.
'manage-members' role
The 'manage-members' role / login name is a special login only given to one person (at a time) in your organization, it allows you to:
- see a list of members
- add a member (automatically sending an invitation email)
- see which members have responded to their invitation email and registered
- re-send an invitation to register
- see which members have the 'authors' role and/or the 'blog-author' role
- add or remove the 'authors' or 'blog-author' role from a member
- suspened or un-suspend a member
- edit a members 'Areas of expertise'—have them show up under Doctor of Medical Heilkunst or Dynamic Blood Counsellor, etc; or not
- delete a member.
First, login with name manage-members
To carry out these tasks login with the username manage-members and you are taken to this page—the 'home' for the manage-members login:
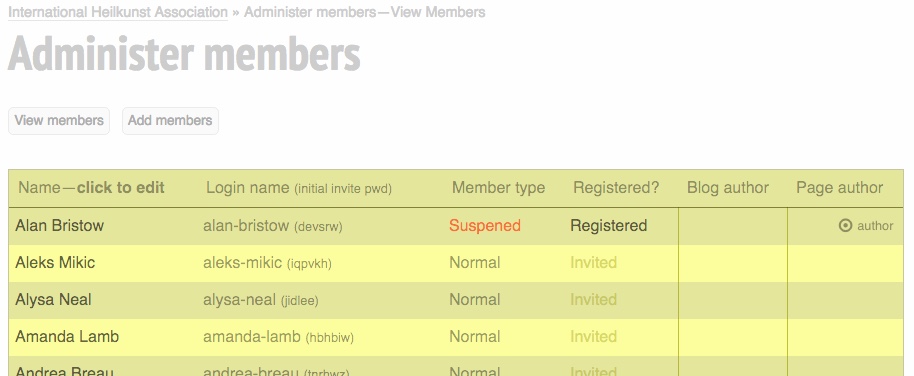
The column headings & buttons
Column, Name
Click the member's name to go to the page with all their management settings.
Column, Login name
The member's login name (and the temporary password they use when they register - these are automatically sent to the member when they are added to the system).
Column, Member type
The type of member, Normal or Suspended (see 'suspend' members).
Column, Registered?
This column initially shows Invited but changes to Registered once the member has registered on the system.
Column, Blog author
This column shows 'blog' if the member is a blog author (see 'Give/remove blog author / authors role' ).
Column, Page author
This column shows 'author' if the member is a a page author (see 'Give/remove blog author / authors role' ).
Button 'View members'
This takes you back to the yellow table.
Button 'Add members'
This takes you to the page for adding a new member.
Adding a new member
In the image with the yellow table above, under 'Administer members' there are two buttons, 'View members' and 'Add members'. To add a member click the 'Add members' button.
This takes you to a form where you enter the new member's name and email. The form sends an invitation to the prospective member with instructions on how to register and adds a row to the yellow table for the member, listing them as 'Invited'.
Finishing up
Before the member may access member Resources they must use the email invite and register at the website.
The member (or someone else at IHA) needs to edit the member's bio page (add contact details, a photo, etc).
Before the member's bio is visible, the manage-members user must edit the member's skills / areas of expertise and select at least one.
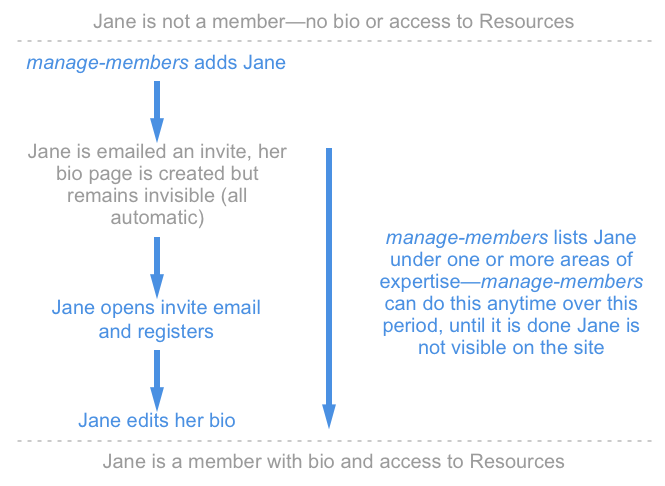
This image summarizes the above 'Adding a new member' steps for prospective member Jane:
Re-invite a member
You would only re-send the invite email to a member if:
- they lost their invitation email
- or if for some reason their invitation email never arrived.
To re-invite a member:
1. click their name in the left column of the yellow table, you're taken to a management page that includes a section like this:
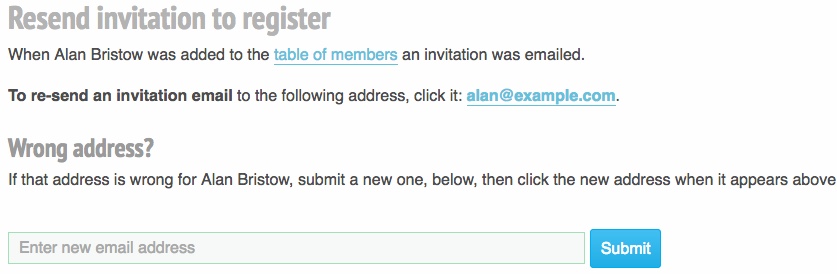
2. in the 'Resend invitation to register' section (shown above) simply follow the instructions (i.e click where it shows their email address).
Note: The 'Resend invitation to register' section (shown above) is only visible if the member has not yet registered.
Edit a member—suspend, give roles etc
The management page for a member allows you to carry out various tasks, it should be self explanatory but each function is explained below.
To edit a member, click their name in the left column of the yellow table and you are taken to a management page like this one:
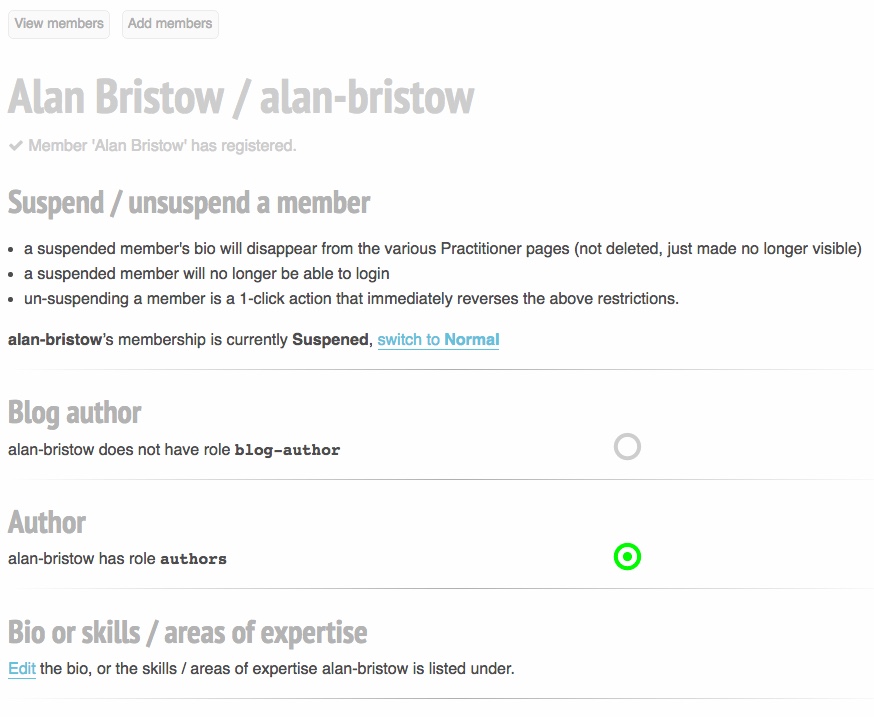
'suspend' members
Sometimes it is helpful to be able to temporarily and non-destructively remove a member from the system.
If you ever need to change a member so that..:
- their bio appears to have been deleted
- they cannot login
- they cannot view the Resources for Practitioners
...then suspend them—after clicking their name in the left column of the yellow table and you have been taken to their management page just follow the instructions to suspend or unsuspend the member.
Should you wish to return them to normal status you simply un-suspend them, a quick and easy process.
Give/remove blog author / authors role
Giving or removing the 'blog-author' role or the 'authors' role from a member is simply a matter of clicking in the circle to the right of each role.
TIP: Usually as few people as is convenient should be given the roles 'authors' and 'blog-author', this focuses tasks with fewer people and speeds up their familiarization.
Edit bio or skills / areas of expertise
A registered member's management page includes a section titled 'Bio or skills / areas of expertise'.
This allows you to visit the members bio page and edit any aspect of their bio including their 'Member skills'.
At time of writing this means you may add or remove any of the following skills from a member:
- Doctor of Medical Heilkunst
- Doctor of Veterinary Heilkunst
- Dynamic Blood Counsellor
- Dynamic Health Counsellor
- Sequential Heilkunst & Homeopathy
Adding (or removing) any of these skills will automatically add (or remove) a members bio from the relevant pages under 'Practitioners'. For example if a member gains the 'Dynamic Blood Counsellor' skill then as soon as you add this to their bio they will automatically be listed with others in the Dynamic Blood Counsellor section.
Also this means that each member has one bio, even if their bio is listed under several areas, so if you edit a members address, the new address is automatically shown in all locations and does not need to be edited oncer per place where it is shown.
Deleting a member
A member's management page includes a section where you may delete that member.
Please read the warnings regarding deleting members—usually it is better to suspend members.
'SEO'—a note to editors
Several major components of good SEO (search engine optimization) practice are built in to the design of this website, however as editors of content you are able to influence SEO more than any automated steps by writing good, original content.
One small way the website is able to help editors is by occasionally drawing attention to content when it meets certain rules, some places where you may encounter this are described below.
Some SEO automation
Many pages have their meta description content automatically written by taking the first N characters of the pages' 'body' text and inserting it in the meta description tag.
At time of writing the content of the meta description tag is likely not used by search engines to rank pages, but is often used to summarize a page when it's listed, so what is written there is what a person will read when deciding if they're going to click or not.
'This page would benefit from an SEO summary...'
You may occasionally see something like this in the footer of a page:
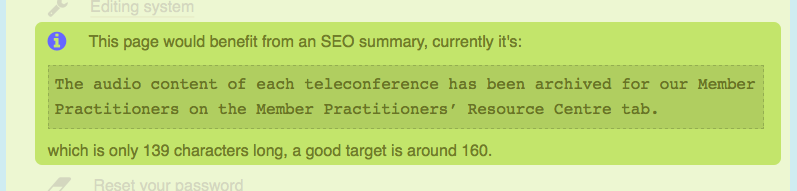
This is where the system has found a page that it thinks should benefit from a meta description but can find too little copy on the page to provide a full length automated one.
You may ignore this, or act on it, it's up to you; generally the more of these you act on, the better.
Acting on 'This page would benefit from an SEO summary...'
The two ways to act on this infomation alert are; write copy on the page or write copy in the special 'SEO summary' field.
When editing a page, it will usually have a special field titled 'SEO summary', if you write content there the system will used that in preference to simply taking a chunk of the first text it finds on the page, so this is an opportunity to craft an excellent 160 character (including spaces) or less summary of the page.
Never write anything that does not appear on the page or search engines (and humans!) may get annoyed. For more on basic SEO good practice speak to your web designer.
Warnings
- if you edit content make sure you save promptly/often
(you are auto-logged out after 30 minutes of inactivity and unsaved changes are lost) - saves are permanent
(there is no undo so if you make a change you later wish to undo you will usually have to add data back by hand) - there are no backups
(unless stated otherwise no backups are routinely maintained, for more about optional backups please contact your web designer).